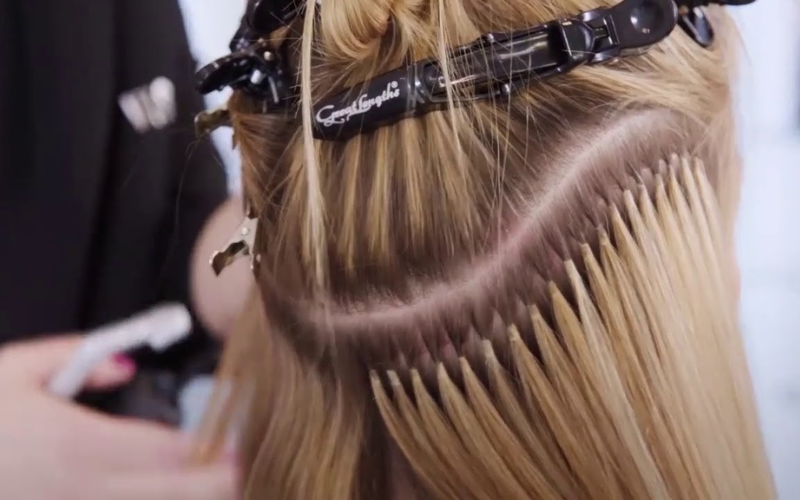
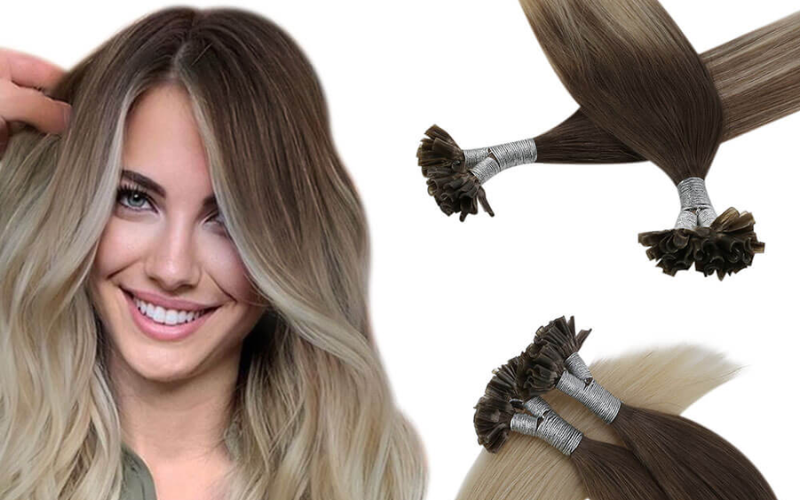
We will show you how to apply u-tip hair extensions. The instructions are straightforward and simple to follow.
How To Put In U-tip Hair Extensions At Home In The Correct Way?
Main contents
Many people who use u-tip hair extensions are constantly worried about how to install them. However, you can definitely do this at home if you are very cautious and meticulous. Let’s learn how to do it with Cyhair and what to look out for in this article.
How to apply u-tip hair extensions and what they are described
Although there are numerous names for it, U-tip hair extensions are not a new hairstyle. So perhaps you are familiar with it under a different name.
- Fusion hair extensions and keratin bond hair extensions are other names for u-tip hair extensions. The fact that it goes by so many names because different people have different ways of describing this kind of hair extension.
- Keratin glue is used to attach hair to one end to create U-tip hair extensions. Nail polish is created using this glue. When attached, the real hair is covered by this glue, which is shaped into a “U”.
- Applying tip-in hair extensions is very different from implementing u-tip hair extensions. To dissolve the glue, you must use a heat source other than fire.
Tip-in hair extensions and u-tip extensions are frequently confused by people. Even so, every type of hair extension has advantages and disadvantages. A lot of people are curious about the benefits and drawbacks of u-tip hair extensions. U-tip curls, on the other hand, have longer-lasting durability.

U-tip hair extensions and what they are described
U-tip hair extension installation: what to prepare
U-tip hair extensions require more time and effort to install than some other types of hair extensions. As a result, before attempting to install it, you must be completely ready.
- The first thing you need is a heat source in order to melt keratin glue. If you don’t have this, keratin glue won’t be able to flow and adhere to real hair.
- Prepare a rat tail brush to facilitate parting, just as you would with other hair extensions. You can part your hair brilliantly and evenly with the aid of this brush.
- When connecting u-tip hair segments, search for specialized stencils. The keratin glue layer and scalp can be separated using this kind of paper. Safeguards the scalp from glue and heat. You might not need them if you know “how to put in u-tip hair extensions,” though.
When attaching hair extensions, you can also get other tools ready. You might require a few items. Similar to detangling sprays, clips, and combs for straightening hair.

What to repair when installing u-tip hair extension
The best way to apply u-tip hair extensions
Care and attention are needed when securing u-tip hair extensions. Therefore, before acting, carefully read the instructions. Your hair is very easily destroyed if you do it wrong.
U-tip hair extension use instructions
How to install u-tip hair extensions is explained in the following.
- To begin, use a brush to split the hair on the head into sections of moderate thickness. Attach the u-tip hair sections next.
- To prepare for the u-tip hair tie, take a modest amount of hair.
- Thread the wax paper through the hair you just removed. To protect your scalp, pull the wax paper close to it.
- Put the u-tip hair extension beneath your natural hair. Attachments should be spaced about 5-7 inches apart and not too close to the hairline.
- Set the appropriate quantity of heat for the heater. You can consult the machine’s manual. The real hair will be damaged if the heat is too high.
- After securing the u-tip section of the hair with real hair, the keratin glue is melted with a machine.
- Keratin glue must dry after flowing for one hour. So you wait 3-5 minutes for the hair to be repaired into the desired position.
- Rep the preceding steps until the u-tip hair extension is finished.
It is not difficult to install u-tip hair extensions. You just need to pay close attention and work hard. You will get used to it and get to be a pro.

U-tip hair extension use instructions
Pay close attention when installing u-tip hair extensions
- If you’re new to applying u-tip extensions, you should start with stencils.
- Please read carefully the heater’s user manual. The temperature of each machine is different. So you must investigate thoroughly or your hair will be damaged.
- Some people are initially allergic to keratin glue because they are unfamiliar with it. So, if you have allergies, ask hair salons for advice on how to put in u-tip hair extensions.
- When melting the glue, use extreme caution. It will almost certainly adhere to your scalp. It will be extremely difficult to remove the glue from the scalp at this point.
- Allow the keratin glue to dry for an extended period of time. So that the glue is completely dry and does not move the position of the hair extensions.
Attaching u-tip hair extensions requires extreme caution. It’s best to seek assistance from someone else. If you are unfamiliar with hair extensions, you can seek advice from a hair salon.
Where to purchase top-notch u-tip hair extensions
There are numerous suppliers of hair extensions available today. However, finding high-quality u-tip hair extensions could be challenging.
- Vietnam is regarded as one of the world’s best hair extension markets. Vietnam is a producer of hair extensions. Many countries, including Brazil and Nigeria, buy hair extensions from Vietnam.
- Vietnamese hair extensions are of high quality because the hair is of good and reputable origin. Vietnamese hair extensions are actually cut from high-mountain Vietnamese women.
Conclusion
Here are our specialized guides. How to Install U-tip Hair Extensions at Home the Right Way. I hope you are able to practice properly and protect your hair from damage.
Contact us:
+ Whatsapp: +84387751243
+ Email: leeanh@cyhair.vn
+ Factory address: Bac Ninh City, an hour’s drive from Hanoi Capital
+ Office: 59 Cong Hoa, Ward 4, Tan Binh District, Ho Chi Minh City.

